This week our playgroup hit the zoo since the weather has been amazing finally. So we continud the theme into preschool. I did the letters G for giraffe and Z for zebra. It was a mild disaster this week. Our lil buddy's mom blew a tire on the way over so she had to hang out waiting for tow and it was just a lot of distractions for the girls. But such is life and we roll with it! We still made it through a few crafts :)
First up I cut out big letter G's and girraffes on yelolw cardstock and Z's and zebras on white with my Cricut. Then we stuck the Z and zebra in a box with several dots of black paint, added a marble, closed it up and shook it all up to make zebra strips!
The Gs and giraffes I gave the girls brown paint and they gave them fingerprint spots.
Last thing we made it to was lion masks. I cut holes in paper plates, cut strips of yellow and brown tone carstock and cut out ear shapes in brown. I hot glued a popsicle stick and the ears on. The I put a bunch of glue around the paper plate for the girls and they put the strips on for the mane. They weren't too into this craft as they were pretty distracted but Z baby did pretty well and she still plays with it and puts it up to her face and ROARS. All in all still a really fun morning!
Sunday, October 20, 2013
A is for Apple
This week we went with the theme of A and 1. I failed to get to the number 1 but we did lots of A! I went with A is for apple.
First up we painted apple trees! I cut big sheets off of a large paper roll I have and drew a tree(ish) outline on it. Trunk and a few branches. I cut an apple in half and gave each girl one half. They painted the apple red and then used it like a stamp. Sort of anyway ;) Then I cut apple slices which they were supposed to use the same way but paint green to make leaves. That part was a fail as both girls hate getting their hands dirty so they stamped once and then couldn't pick up the slice without getting their hands dirty so they refused. So instead they just painted leaves however they wanted. Next up they painted the trunks. I explained the base of the tree is called the tree trunk. To which our lil buddy said "like an elephant!" gotta love little kids! Anyway that was our apple trees!
After that we made apple cake. I used this RECIPE. I WAY overcooked it. It says to go until it tests done. Well I think the moisture from the apples made it appear still uncooked when it really was done. So we had super crunchy apple cake lol. The middle was soft and it still tasted good and both girlies ate it. They had fun dumping the ingredients in and watching the mixer.
After that we glued shredded paper onto an apple shape. Both this and the apple trees were good lessons on listening to directions. They had to listen and put the correct colors in the correct places. Obviously they are 2&3 so not a big deal if they wanted a brown apple instead of red but I think its good to try and encourage them to listen to directions. And they really did pretty well. They also colored apple pictures with crayons and had free reign to use any color their hearts desired :)
An apple a day!
Wednesday, September 25, 2013
Very Hungry Caterpillar
Preschool theme this week was a classic! The Very Hungry Caterpillar by Eric Carle. We of course first read the book. Then our big craft was the life cycle of the butterfly all done on a paper plate, they either glued the stuff onto plate or onto a clothespin that I then clipped to the plate. I had some plastic-ish leaves and little white puff ball things that they glued on for the first phase, the egg on the leaf. Then medium sized green and red puff balls to make the little caterpillar. Next phase bigger puffs for the big fat caterpillar and we glued those on a clothespin so he could "eat" stuff. For the butterfly I grabbed cone shaped coffee filters and snipped off the edges and let them use water colors to paint it. Then I was going to use a spray bottle to spritz it but of course in true me fashion no water bottle to be found. So I just dribbled a little water over them, worked fine. It just spreads out the water colors and makes it a lil prettier :) Plus they get a kick out of watching the colors spread. They also painted clothespins. Then I stuck the wings in the clothespin and added pipe cleaner antennae.
Then it was snack time. Couldn't resist banana butterflies! They thought it was funny. There may have also been chocolate peanut butter and lots more pretzels involved after I took a picture of it. They were all over the chocolate PB!
Then we did a sheet or two of line tracing, tried using scissors for a few minutes and lots of dot art. I just made my own dot art sheets in google documents. They aren't perfect but the girls didn't care and could identify each thing so we will call it a success. The goal with the dot art was coordination of getting the dots in the circle and also color matching. The circles were different colors and they were supposed to use the matching dot marker. They sort of got it. They loved doing it just neither really wanted to take the time to get the correct colors. Definitely be doing this activity again though. All in all a fun morning :)
Then it was snack time. Couldn't resist banana butterflies! They thought it was funny. There may have also been chocolate peanut butter and lots more pretzels involved after I took a picture of it. They were all over the chocolate PB!
Thursday, September 19, 2013
Preschool time!
Its been awhile! We welcomed a new little peanut in June :) Been a whirlwind!
My good friend and I started homeschool preschool last week. I get the girls one day a week for school and she gets them one day a week for school. Not only is it awesome to see them learning but I get a few hours a week to bust out some cleaning and Etsy orders without having to entertain my 3 year old at the same time! Double win for mom :)
So for preschool we are picking a theme each week. Last week was weather because it had rained earlier in the week and had been cloudy. A nice break from our blazing heat! So for my day we did 2 crafts. The first was rain in a jar. Very simple. I used a mason jar for each girl and filled it with some water (don't go all the way full). Then stuck some shaving cream on top. Or if you are forgetful like me and don't check till 11pm the night before to see if you have shaving cream you can use shaving gel. It still works. The "cloud" won't look quite so puffy and you kind of have to wait a few seconds for the gel to go white but it still worked out. Then I gave each girl a small cup with water with food coloring in it. Blue and green worked well. Then they each got a little dropper thing (from oriental trading, not a big fan they break easily but oh well) and got to drop the colored water onto the "cloud" and then watch it rain.
Total hit! Girls loved it so much we did it twice (and they asked to do it again this week too!). They totally missed the learning aspect of water, clouds, rains but hey they are 2 & 3. I was just super surprised there was no mess after we were done!
Next up was sun catchers! I cut out clouds on white cardstock and rain drops on black cardstock. Then I stuck the rain drops on contact paper and cut it to the rain drop shape. Tore up some white, glittered and blue tissue paper and grabbed cotton balls and ribbon.
They glued the cotton balls to the cloud and then stuck the tissue to the rain drops.
Then I strung them up and voila! I actually love the way it looks and has been hanging on our back door for a week :)
And we also did line and letter tracing. Introduced the letter W for weather. I used some workbooks I got off of Amazon and made copies of the pages we used. And then lastly we had a snack. I put yogurt, PB, honey and a little cinnamon in a bowl for each and then let them mix it up. They got a kick out of "making" their own snack. I gave them graham crackers and apple slices to dip in the yogurt mix. Have to say it was rather yummy. Mommy may have tasted Z baby's a few times :)
I must say it is very interesting to see the differences in the two girls. 6 months apart and some activities hardly any difference in the two and other things one or the other can be miles ahead of the other. I absolutely love our preschool time and so blessed to have a good friend willing and excited to take this adventure with me!
My good friend and I started homeschool preschool last week. I get the girls one day a week for school and she gets them one day a week for school. Not only is it awesome to see them learning but I get a few hours a week to bust out some cleaning and Etsy orders without having to entertain my 3 year old at the same time! Double win for mom :)
So for preschool we are picking a theme each week. Last week was weather because it had rained earlier in the week and had been cloudy. A nice break from our blazing heat! So for my day we did 2 crafts. The first was rain in a jar. Very simple. I used a mason jar for each girl and filled it with some water (don't go all the way full). Then stuck some shaving cream on top. Or if you are forgetful like me and don't check till 11pm the night before to see if you have shaving cream you can use shaving gel. It still works. The "cloud" won't look quite so puffy and you kind of have to wait a few seconds for the gel to go white but it still worked out. Then I gave each girl a small cup with water with food coloring in it. Blue and green worked well. Then they each got a little dropper thing (from oriental trading, not a big fan they break easily but oh well) and got to drop the colored water onto the "cloud" and then watch it rain.
Total hit! Girls loved it so much we did it twice (and they asked to do it again this week too!). They totally missed the learning aspect of water, clouds, rains but hey they are 2 & 3. I was just super surprised there was no mess after we were done!
Next up was sun catchers! I cut out clouds on white cardstock and rain drops on black cardstock. Then I stuck the rain drops on contact paper and cut it to the rain drop shape. Tore up some white, glittered and blue tissue paper and grabbed cotton balls and ribbon.
They glued the cotton balls to the cloud and then stuck the tissue to the rain drops.
Then I strung them up and voila! I actually love the way it looks and has been hanging on our back door for a week :)
And we also did line and letter tracing. Introduced the letter W for weather. I used some workbooks I got off of Amazon and made copies of the pages we used. And then lastly we had a snack. I put yogurt, PB, honey and a little cinnamon in a bowl for each and then let them mix it up. They got a kick out of "making" their own snack. I gave them graham crackers and apple slices to dip in the yogurt mix. Have to say it was rather yummy. Mommy may have tasted Z baby's a few times :)
I must say it is very interesting to see the differences in the two girls. 6 months apart and some activities hardly any difference in the two and other things one or the other can be miles ahead of the other. I absolutely love our preschool time and so blessed to have a good friend willing and excited to take this adventure with me!
Friday, March 8, 2013
Cluck cluck
Since we did beer butt chickens and had the carcasses left it was time to make chicken stock! Good thing too since I used up ours making dumplings and chicken pot pie this week. And just a side note- if you smoke the chickens skip making stock with those ones. It will be bit smokey flavored stock if you do use them. Not that I've done that or anything ;)
I use Alton Brown's recipe: Chicken Stock. We love Alton :) really the only thing I changed off the recipe was I didn't use a leek because I may have forgotten to buy one...whoops. And we put cheese cloth over a mesh colander to strain it since we don't have a fine strainer.
Cooling stock (ignore the disgusting stove top, it didn't get cleaned up yet):
Saturday, March 2, 2013
Beer Butt Chicken
Nom time :) we made beer butt chickens tonight for dinner. Even Z baby ate it! And she rarely eats anything beyond fruit and sweets!
This is one of those recipes where we just sorta wing it. I never thought we had many of those recipes but apparently I just don't pay attention. So what we do is take a can of beer. Drink about half. And for the love of goodness don't waste good beer please! Use a cheaper beer for this! We then chop up some onion and garlic and stick it in the can with the beer. We've added other stuff in the past as well, but these two are always in there. Feel free to play with different flavors. I think we've even thrown butter in too. Anyways. We then stick the can in one of THESE type things. They have worked well for us. Throw your chicken that you've cleaned up over the top of it. We then pat on some EVOO all over the chickies, sprinkle with some garlic salt, pepper and paprika. Again you can sprinkle on whatever you want, fun to play with! Then in the oven it goes. Be sure to put it on a pan with sides as the chickies will juice a bit and no one wants that all over their oven :) We stick it in at 350, stick a temp probe in it and wait till it comes up to temp, I believe you want it to be at least 165 internal temp. We did 2 chickies last night and it took around an hour and a half. Taking it off the can thing can be a lil tricky, I recommend having help! Let the chicks rest a few minutes and then have one person stab the chick on either side with forks while the other person uses forks to hold down the beer can/ metal holder thingy as it will tend to stick to it. I've seen to spray the metal thing and beer can with cooking spray before putting the chicken on and cooking which we have tried but it didn't make a difference for us. Maybe I didn't use enough spray, who knows. But nonetheless it's never been too horribly difficult to get the chicks off the can contraption. Carve those suckers up and enjoy! Next posts will be chicken pot pie with the leftovers! And also chicken stock using up the carcasses :)
Thursday, February 28, 2013
Dot art!
Growing up I used to play with those bingo dot markers and loved it! Not entirely sure why I didn't just buy some but at some point I got the idea to get some refillable bottles from Oriental Trading. I put in Crayola non toxic paint and watered it down. Wasn't super thrilled with the watered down paint look but it more or less worked. This was a last minute, momma has a headache and desperately needs to occupy a toddler going mad with cabin fever craft :) so I just gave her paper to dot on. One plain and the other I wrote her name (horrible looking) across and showed her to dot along the lines.
If I were to prep this another day I would either find a printable or make one with letters made with lil circles so she can dot in the circles. Anyway it kept her occupied for a bit and she has asked to play with it since then, so I count it as a success!
Wednesday, February 27, 2013
Baby shower gifts
Z baby's playgroup threw a baby shower for one of our fabulous mommies this week. I wanted to do something fun. So I made a baby sock bouquet and a hospital survival kit. The kit well I somehow forgot to take pics of. I just bought some little travel items. I did toothbrush and tooth paste, lotion, Chapstick, make up remover cloths, hand wipes, Kleenex (am I the only one that cried tons of happy tears and hated hospital tissue?!?) and some candies. I stuck it in a bag with some ribbon and a label I made with my cricut that said Hospital Survival Kit.
The sock bouquet was fun :) bought a pack of 6 socks and then bought fake flowers, a little vase, vase filler rock things and some ribbon at the dollar store. Found a youtube video and rolled up the lil sock flowers. Then I had the hubs cut the flowers apart since they were all one connected bunch and I ripped off the flower part. Then I ripped off the little leaf base piece that is on the bottom of the flowers. I used some green tape and wrapped around the stems a bit and then slid the leave base part on that. You need the tape to keep it from moving otherwise the leaf base piece just slides all over. Then I just set the sock flowers on the top. Then you have to be careful as the "flowers" are just resting there and will fall off if moved around much. I'm sure there is some far better method than this to secure them but that's what I did and I thought it looked pretty good. Tie a ribbon on the vase and add a cricut made tag and you are set :D
Thursday, February 21, 2013
Muffins!
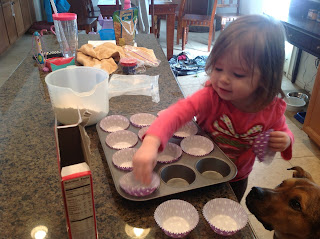
Zoey found a boxed muffin mix in the pantry this morning. I'm not a huge fan of boxed mixes but it made its way into this house somehow... I blame pregnancy :) it's easy for me to want to just make them on my own. It's simpler, less mess and quicker. But where's the memories in that? It's the mess and the smiles that make it fun :) I often forget Z baby is getting older and can do more with me. So we made muffins together today. Chocolate chip since she is a chocoholic. Runs in our family! Great-grandpa, grandma, uncle and mommy are all chocoholics right along with her.
I stirred it up and then she scooped it into the cups. She did really well. Although she hates getting her hands dirty so we had to stop and wipe her hands about 10 times.
And well there just wasn't enough chocolate chips so we added some on top :) She wanted to add peanuts too but I drew the line there.
Quality test! She had to first pick out all the chocolate chips she could and then surprisingly ate the rest. Usually she would leave all the bread. Told ya she was a chocoholic!
She lined the cups
She dumped the mix in. She also dumped in the water and oil.
I stirred it up and then she scooped it into the cups. She did really well. Although she hates getting her hands dirty so we had to stop and wipe her hands about 10 times.
And well there just wasn't enough chocolate chips so we added some on top :) She wanted to add peanuts too but I drew the line there.
Quality test! She had to first pick out all the chocolate chips she could and then surprisingly ate the rest. Usually she would leave all the bread. Told ya she was a chocoholic!
Wednesday, February 20, 2013
Snow!
Rare for us here in AZ :) we didn't get as much as others in town but still fun! Glad I started my garden a couple days ago (insert eye roll). I was too busy taking pictures to think about covering my plants. Woops.
Made Z baby go out in it. She thought it was too cold!
Our mutt pushed Z over to get outside and then promptly wanted back inside. He seemed to really like running in the mud but I think he was just cold. Our shih-tzu went out for a few minutes but I don't think she even know it was snowing, she is due for a haircut and is super fluffly! Don't think she ever felt the snow.
Z baby did want to play in the mud in the backyard but got upset and was over it all when she got stuck in the mud. Being the horrible momma I am, I laughed, took a picture and then rescued her :)
Tuesday, February 19, 2013
Fry bread and beans!
Mmmmm...
I use the fry bread recipe from THIS recipe. I get 4 out of the recipe, we had already dug in :) Good eats!
Then just top with whatever you like! We typically do lettuce, cheese, salsa and sour cream. Guacamole is yum too!
Thursday, February 7, 2013
Veggie Scramble
Saturday, January 19, 2013
Pizza Night!
Hubs good buddy's introduced us to awesome homemade pizza a few years ago. Before that I don't think I had made pizza since high school haha. It's basic. Homemade dough and then top and bake! We don't use precise measurement s beyond the dough. When we roll out the dough we roll the edges of the dough up a bit to create a little crust barrier so cheese and toppings don't drip off. Nothing like a grease slick going all over your oven! Not that we have done that more times than I care to admit... Once you have the dough all rolled out transfer it to a pizza paddle that has a generous amount of corn meal sprinkled on it. I like to check to make sure the dough isn't sticking at this point, just give the paddle a little jerk and make sure it slides a bit. We prefer marinara sauce for sauce and then pile on cheese and toppings. Again once it is topped I like to make sure its going to slide off so I jiggle the paddle a little make sure the pizza slides just a little. Then we stick in the oven on a pizza stone. We set the oven to 425 and you want to preheat with the stone in there. Then we just watch the pizzas. I really have no idea how long it cooks, told ya we aren't precise with our pizzas! We do one pizza at a time too. Also a word of warning especially if you haven't done it before, the corn meal on the paddle can come off and right into your oven very easily as well as toppings and stuff can slide off onto the stone and it can all burn a bit. Nothing to worry about really but if you are like us and have a very sensitive smoke detector you may want to turn the oven vent on and open some windows before baking. Our dogs and toddler freak when the alarm goes off :) Our shih-tzu took off down the street once, she hates it that much!
Dough recipe (makes 2 pizzas):
4 1/2 cups flour
1 3/4 teaspoons salt
1 teaspoon instant yeast
1/4 cup olive oil
1/4 C warm water plus 1 & 1/2 C cups water
honey
Combine yeast and 1/4 C warm water and a little honey. I'd say I usually use 1/2-1 tsp honey. Not too much. Give it a mix and let it rest for 10-15 minutes. It should look sort frothy I guess would be the best description. Dump it in mixer and add all the other ingredients. Let the mixer mix on low until the dough has come together and is smooth looking. If it seems really sticky add a little flour and mix some more. Take the dough hook out and cover the bowl with a towel. I let the dough rest for about 4 or 5 hours. Then split it into two equal parts and roll out on a floured surface.
Subscribe to:
Posts (Atom)